尚硅谷shiro框架学习-基础内容介绍
作者:whisper
链接:http://proprogrammar.com:443/article/86
声明:请尊重原作者的劳动,如需转载请注明出处
简介
Apache Shiro 是 Java 的一个安全(权限)框架。 类似产品还有Spring Security。Shiro 可以非常容易的开发出足够好的应用,其不仅可以用在JavaSE 环境,也可以用在 JavaEE 环境。
功能
基本功能点如下图所示:
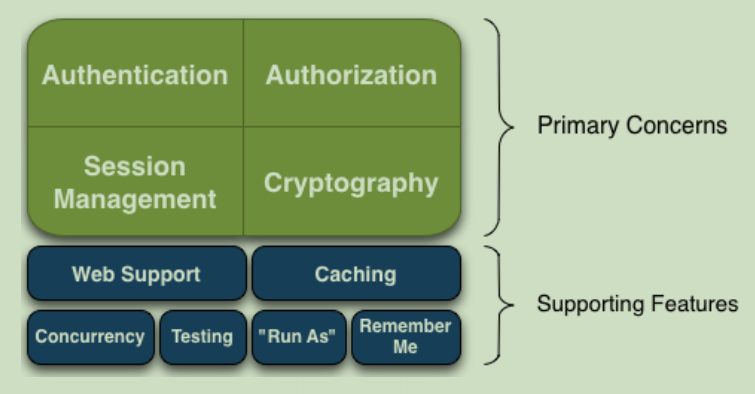
Authorization:授权,即权限验证,验证某个已认证的用户是否拥有某个权限;即判断用户是否能进行什么操作,如:验证某个用户是否拥有某个角色。或者细粒度的验证某个用户对某个资源是否具有某个权限;
Cryptography:加密,保护数据的安全性,如密码加密存储到数据库,而不是明文存储;
Caching:缓存,比如用户登录后,其用户信息、拥有的角色/权限不必每次去查,这样可以提高效率;
Testing:提供测试支持;
Remember Me:记住我,这个是非常常见的功能,即一次登录后,下次再来的话不用登录了
架构
从外部来看Shiro ,即从应用程序角度的来观察如何使用 Shiro 完成工作:
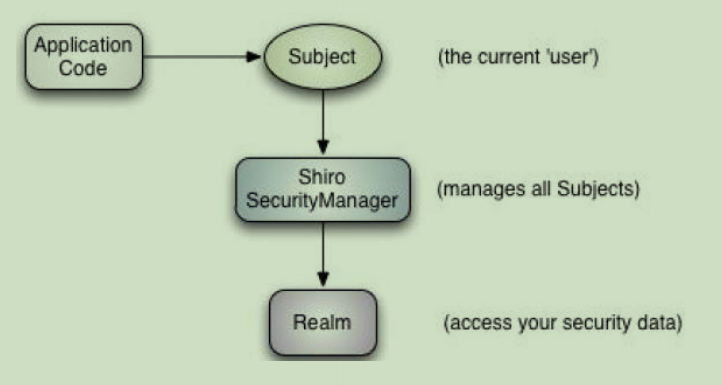
SecurityManager:安全管理器;即所有与安全有关的操作都会与SecurityManager 交互;且其管理着所有 Subject;可以看出它是 Shiro的核心,它负责与 Shiro 的其他组件进行交互,它相当于 SpringMVC 中DispatcherServlet 的角色
Shiro 架构(Shiro内部来看)
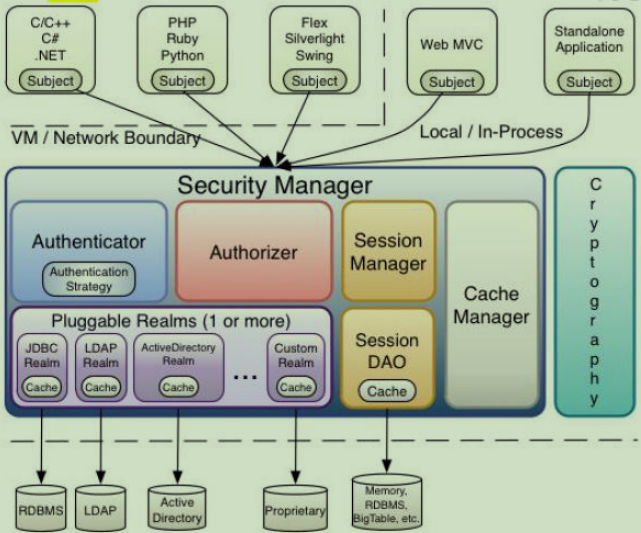
SecurityManager :相当于SpringMVC 中的 DispatcherServlet;是 Shiro 的心脏;所有具体的交互都通过 SecurityManager 进行控制;它管理着所有 Subject、且负责进行认证、授权、会话及缓存的管理。
Authorizer:授权器、即访问控制器,用来决定主体是否有权限进行相应的操作;即控制着用户能访问应用中的哪些功能;
SessionManager:管理 Session 生命周期的组件;而 Shiro 并不仅仅可以用在 Web环境,也可以用在如普通的 JavaSE 环境
Cryptography:密码模块,Shiro 提高了一些常见的加密组件用于如密码加密/解密。
快速开始程序
需要如下jar包
log4j-1.2.15.jar
slf4j-log4j12-1.6.1.jar
package com.atguigu.shiro.helloworld;

import org.apache.shiro.SecurityUtils;
import org.apache.shiro.authc.*;
import org.apache.shiro.config.IniSecurityManagerFactory;
import org.apache.shiro.mgt.SecurityManager;
import org.apache.shiro.session.Session;
import org.apache.shiro.subject.Subject;
import org.apache.shiro.util.Factory;
import org.slf4j.Logger;
import org.slf4j.LoggerFactory;


/**
 * Simple Quickstart application showing how to use Shiro's API.
 *
 * @since 0.9 RC2
 */
public class Quickstart {

    private static final transient Logger log = LoggerFactory.getLogger(Quickstart.class);


    public static void main(String[] args) {

        // The easiest way to create a Shiro SecurityManager with configured
        // realms, users, roles and permissions is to use the simple INI config.
        // We'll do that by using a factory that can ingest a .ini file and
        // return a SecurityManager instance:

        // Use the shiro.ini file at the root of the classpath
        // (file: and url: prefixes load from files and urls respectively):
    	// 从ini文件加载配置,真正开发时并不这样用,会从数据库等加载配置
        Factory<SecurityManager> factory = new IniSecurityManagerFactory("classpath:shiro.ini");
        // 从安全管理器工厂获取安全管理器
        SecurityManager securityManager = factory.getInstance();

        // for this simple example quickstart, make the SecurityManager
        // accessible as a JVM singleton.  Most applications wouldn't do this
        // and instead rely on their container configuration or web.xml for
        // webapps.  That is outside the scope of this simple quickstart, so
        // we'll just do the bare minimum so you can continue to get a feel
        // for things.
        // 设置安全管理器(里面包含了从ini配置文件加载的配置)
        SecurityUtils.setSecurityManager(securityManager);

        // Now that a simple Shiro environment is set up, let's see what you can do:

        // get the currently executing user:
        // 获取当前的 Subject. 调用 SecurityUtils.getSubject();
        Subject currentUser = SecurityUtils.getSubject();

        // Do some stuff with a Session (no need for a web or EJB container!!!)
        // 测试使用 Session
        // 获取 Session: Subject#getSession()
        Session session = currentUser.getSession();
        session.setAttribute("someKey", "aValue");
        String value = (String) session.getAttribute("someKey");
        if (value.equals("aValue")) {
            log.info("---> Retrieved the correct value! [" + value + "]");
        }

        // let's login the current user so we can check against roles and permissions:
        // 测试当前的用户是否已经被认证. 即是否已经登录.
        // 调动 Subject 的 isAuthenticated()
        if (!currentUser.isAuthenticated()) {
        	// 把用户名和密码封装为 UsernamePasswordToken 对象
            UsernamePasswordToken token = new UsernamePasswordToken("lonestarr", "vespa");
            // rememberme,在关闭并重新打开流浏览器后,不用再次登陆
            token.setRememberMe(true);
            try {
            	// 执行登录.
                currentUser.login(token);
            }
            // 若没有指定的账户, 则 shiro 将会抛出 UnknownAccountException 异常.
            catch (UnknownAccountException uae) {
                log.info("----> There is no user with username of " + token.getPrincipal());
                return;
            }
            // 若账户存在, 但密码不匹配, 则 shiro 会抛出 IncorrectCredentialsException 异常。
            catch (IncorrectCredentialsException ice) {
                log.info("----> Password for account " + token.getPrincipal() + " was incorrect!");
                return;
            }
            // 用户被锁定的异常 LockedAccountException
            catch (LockedAccountException lae) {
                log.info("The account for username " + token.getPrincipal() + " is locked.  " +
                        "Please contact your administrator to unlock it.");
            }
            // ... catch more exceptions here (maybe custom ones specific to your application?
            // 所有认证时异常的父类.
            catch (AuthenticationException ae) {
                //unexpected condition?  error?
            }
        }

        //say who they are:
        //print their identifying principal (in this case, a username):
        // 当前用户
        log.info("----> User [" + currentUser.getPrincipal() + "] logged in successfully.");

        //test a role:
        // 测试是否有某一个角色. 调用 Subject 的 hasRole 方法.
        if (currentUser.hasRole("schwartz")) {
            log.info("----> May the Schwartz be with you!");
        } else {
            log.info("----> Hello, mere mortal.");
            return;
        }

        //test a typed permission (not instance-level)
        // 测试用户是否具备某一个行为. 调用 Subject 的 isPermitted() 方法。
        if (currentUser.isPermitted("lightsaber:weild")) {
            log.info("----> You may use a lightsaber ring.  Use it wisely.");
        } else {
            log.info("Sorry, lightsaber rings are for schwartz masters only.");
        }

        //a (very powerful) Instance Level permission:
        // 测试用户是否具备某一个行为.
        if (currentUser.isPermitted("user:delete:zhangsan")) {
            log.info("----> You are permitted to 'drive' the winnebago with license plate (id) 'eagle5'.  " +
                    "Here are the keys - have fun!");
        } else {
            log.info("Sorry, you aren't allowed to drive the 'eagle5' winnebago!");
        }

        System.out.println("---->" + currentUser.isAuthenticated());

        //all done - log out!
        // 执行登出. 调用 Subject 的 Logout() 方法.
        currentUser.logout();

        System.out.println("---->" + currentUser.isAuthenticated());

        System.exit(0);
    }
}
配置spring开发环境
首先新建一个web工程
配置web.xml
包括spring配置,springmvc配置,shiro配置
<?xml version="1.0" encoding="UTF-8"?>
<web-app xmlns:xsi="http://www.w3.org/2001/XMLSchema-instance"
	xmlns="http://java.sun.com/xml/ns/javaee"
	xsi:schemaLocation="http://java.sun.com/xml/ns/javaee http://java.sun.com/xml/ns/javaee/web-app_2_5.xsd"
	id="WebApp_ID" version="2.5">

	<!-- needed for ContextLoaderListener -->
	<context-param>
		<param-name>contextConfigLocation</param-name>
		<param-value>classpath:applicationContext.xml</param-value>
	</context-param>

	<!-- Bootstraps the root web application context before servlet initialization -->
	<listener>
		<listener-class>org.springframework.web.context.ContextLoaderListener</listener-class>
	</listener>

	<!-- The front controller of this Spring Web application, responsible for handling all application requests -->
	<servlet>
		<servlet-name>spring</servlet-name>
		<servlet-class>org.springframework.web.servlet.DispatcherServlet</servlet-class>
		<load-on-startup>1</load-on-startup>
	</servlet>

	<!-- Map all requests to the DispatcherServlet for handling -->
	<servlet-mapping>
		<servlet-name>spring</servlet-name>
		<url-pattern>/</url-pattern>
	</servlet-mapping>

	<!-- Shiro Filter is defined in the spring application context: -->
	<!--
	1. 配置  Shiro 的 shiroFilter.
	2. DelegatingFilterProxy 实际上是 Filter 的一个代理对象. 默认情况下, Spring 会到 IOC 容器中查找和
	<filter-name> 对应的 filter bean. 也可以通过 targetBeanName 的初始化参数来配置 filter bean 的 id.
	-->
    <filter>
        <filter-name>shiroFilter</filter-name>
        <filter-class>org.springframework.web.filter.DelegatingFilterProxy</filter-class>
        <init-param>
            <param-name>targetFilterLifecycle</param-name>
            <param-value>true</param-value>
        </init-param>
        <!-- 通过targetBeanName配置spring的bean的id,把对shiro的操作都委托给这个bean -->
        <init-param>
            <param-name>targetBeanName</param-name>
            <param-value>shiroFilter</param-value>
        </init-param>
    </filter>

    <filter-mapping>
        <filter-name>shiroFilter</filter-name>
        <url-pattern>/*</url-pattern>
    </filter-mapping>

</web-app>配置springmvc:spring-servlet.xml
<?xml version="1.0" encoding="UTF-8"?>
<beans xmlns="http://www.springframework.org/schema/beans"
	xmlns:xsi="http://www.w3.org/2001/XMLSchema-instance"
	xmlns:mvc="http://www.springframework.org/schema/mvc"
	xmlns:context="http://www.springframework.org/schema/context"
	xsi:schemaLocation="http://www.springframework.org/schema/mvc http://www.springframework.org/schema/mvc/spring-mvc-4.0.xsd
		http://www.springframework.org/schema/beans http://www.springframework.org/schema/beans/spring-beans.xsd
		http://www.springframework.org/schema/context http://www.springframework.org/schema/context/spring-context-4.0.xsd">

	<context:component-scan base-package="com.atguigu.shiro"></context:component-scan>

	<bean class="org.springframework.web.servlet.view.InternalResourceViewResolver">
		<property name="prefix" value="/"></property>
		<property name="suffix" value=".jsp"></property>
	</bean>

	<mvc:annotation-driven></mvc:annotation-driven>
	<mvc:default-servlet-handler/>

</beans>
配置spring:applicationContext.xml,一个完整的例子,1~6步
<?xml version="1.0" encoding="UTF-8"?>
<beans xmlns="http://www.springframework.org/schema/beans"
	xmlns:xsi="http://www.w3.org/2001/XMLSchema-instance"
	xsi:schemaLocation="http://www.springframework.org/schema/beans http://www.springframework.org/schema/beans/spring-beans.xsd">

    <!-- =========================================================
         Shiro Core Components - Not Spring Specific
         ========================================================= -->
    <!-- Shiro's main business-tier object for web-enabled applications
         (use DefaultSecurityManager instead when there is no web environment)-->
    <!--
    1. 配置 SecurityManager!
    -->
    <bean id="securityManager" class="org.apache.shiro.web.mgt.DefaultWebSecurityManager">
        <property name="cacheManager" ref="cacheManager"/>
        <property name="authenticator" ref="authenticator"></property>

        <property name="realms">
        	<list>
    			<ref bean="jdbcRealm"/>
    			<ref bean="secondRealm"/>
    		</list>
        </property>

        <property name="rememberMeManager.cookie.maxAge" value="10"></property>
    </bean>

    <!-- Let's use some enterprise caching support for better performance.  You can replace this with any enterprise
         caching framework implementation that you like (Terracotta+Ehcache, Coherence, GigaSpaces, etc -->
    <!--
    2. 配置 CacheManager.
    2.1 需要加入 ehcache 的 jar 包及配置文件.
    -->
    <bean id="cacheManager" class="org.apache.shiro.cache.ehcache.EhCacheManager">
        <!-- Set a net.sf.ehcache.CacheManager instance here if you already have one.  If not, a new one
             will be creaed with a default config:
             <property name="cacheManager" ref="ehCacheManager"/> -->
        <!-- If you don't have a pre-built net.sf.ehcache.CacheManager instance to inject, but you want
             a specific Ehcache configuration to be used, specify that here.  If you don't, a default
             will be used.: -->
        <property name="cacheManagerConfigFile" value="classpath:ehcache.xml"/>
    </bean>

    <!-- Used by the SecurityManager to access security data (users, roles, etc).
         Many other realm implementations can be used too (PropertiesRealm,
         LdapRealm, etc. -->
    <!--
    	3. 配置 Realm
    	3.1 直接配置实现了 org.apache.shiro.realm.Realm 接口的 bean
    -->
    <bean id="jdbcRealm" class="com.atguigu.shiro.realms.ShiroRealm">
    	<property name="credentialsMatcher">
    		<bean class="org.apache.shiro.authc.credential.HashedCredentialsMatcher">
    			<property name="hashAlgorithmName" value="MD5"></property>
    			<property name="hashIterations" value="1024"></property>
    		</bean>
    	</property>
    </bean>

    <bean id="secondRealm" class="com.atguigu.shiro.realms.SecondRealm">
    	<property name="credentialsMatcher">
    		<bean class="org.apache.shiro.authc.credential.HashedCredentialsMatcher">
    			<property name="hashAlgorithmName" value="SHA1"></property>
    			<property name="hashIterations" value="1024"></property>
    		</bean>
    	</property>
    </bean>

    <!-- =========================================================
         Shiro Spring-specific integration
         ========================================================= -->
    <!-- Post processor that automatically invokes init() and destroy() methods
         for Spring-configured Shiro objects so you don't have to
         1) specify an init-method and destroy-method attributes for every bean
            definition and
         2) even know which Shiro objects require these methods to be
            called. -->
    <!--
    4. 配置 LifecycleBeanPostProcessor. 可以自定的来调用配置在 Spring IOC 容器中 shiro bean 的生命周期方法.
    -->
    <bean id="lifecycleBeanPostProcessor" class="org.apache.shiro.spring.LifecycleBeanPostProcessor"/>

    <!-- Enable Shiro Annotations for Spring-configured beans.  Only run after
         the lifecycleBeanProcessor has run: -->
    <!--
    5. 启用 IOC 容器中使用 shiro 的注解. 但必须在配置了 LifecycleBeanPostProcessor 之后才可以使用.
    -->
    <bean class="org.springframework.aop.framework.autoproxy.DefaultAdvisorAutoProxyCreator"
          depends-on="lifecycleBeanPostProcessor"/>
    <bean class="org.apache.shiro.spring.security.interceptor.AuthorizationAttributeSourceAdvisor">
        <property name="securityManager" ref="securityManager"/>
    </bean>

    <!-- Define the Shiro Filter here (as a FactoryBean) instead of directly in web.xml -
         web.xml uses the DelegatingFilterProxy to access this bean.  This allows us
         to wire things with more control as well utilize nice Spring things such as
         PropertiesPlaceholderConfigurer and abstract beans or anything else we might need: -->
    <!--
    6. 配置 ShiroFilter.
    6.1 id 必须和 web.xml 文件中配置的 DelegatingFilterProxy 的 <filter-name> 一致.
                      若不一致, 则会抛出: NoSuchBeanDefinitionException. 因为 Shiro 会来 IOC 容器中查找和 <filter-name> 名字对应的 filter bean.
    -->
    <bean id="shiroFilter" class="org.apache.shiro.spring.web.ShiroFilterFactoryBean">
        <property name="securityManager" ref="securityManager"/>
        <property name="loginUrl" value="/login.jsp"/>
        <property name="successUrl" value="/list.jsp"/>
        <property name="unauthorizedUrl" value="/unauthorized.jsp"/>

        <property name="filterChainDefinitionMap" ref="filterChainDefinitionMap"></property>

        <!--
        	配置哪些页面需要受保护.
        	以及访问这些页面需要的权限.
        	1). anon 可以被匿名访问
        	2). authc 必须认证(即登录)后才可能访问的页面.
        	3). logout 登出.
        	4). roles 角色过滤器
        -->
        <!--
        <property name="filterChainDefinitions">
            <value>
                /login.jsp = anon
                /shiro/login = anon
                /shiro/logout = logout

                /user.jsp = roles[user]
                /admin.jsp = roles[admin]

                # everything else requires authentication:
                /** = authc
            </value>
        </property>
         -->
    </bean>

    <bean id="authenticator"
    	class="org.apache.shiro.authc.pam.ModularRealmAuthenticator">
    	<property name="authenticationStrategy">
    		<bean class="org.apache.shiro.authc.pam.AtLeastOneSuccessfulStrategy"></bean>
    	</property>
    </bean>

    <!-- 配置一个 bean, 该 bean 实际上是一个 Map. 通过实例工厂方法的方式 -->
    <bean id="filterChainDefinitionMap"
    	factory-bean="filterChainDefinitionMapBuilder" factory-method="buildFilterChainDefinitionMap"></bean>

    <bean id="filterChainDefinitionMapBuilder"
    	class="com.atguigu.shiro.factory.FilterChainDefinitionMapBuilder"></bean>

    <bean id="shiroService"
    	class="com.atguigu.shiro.services.ShiroService"></bean>

</beans>
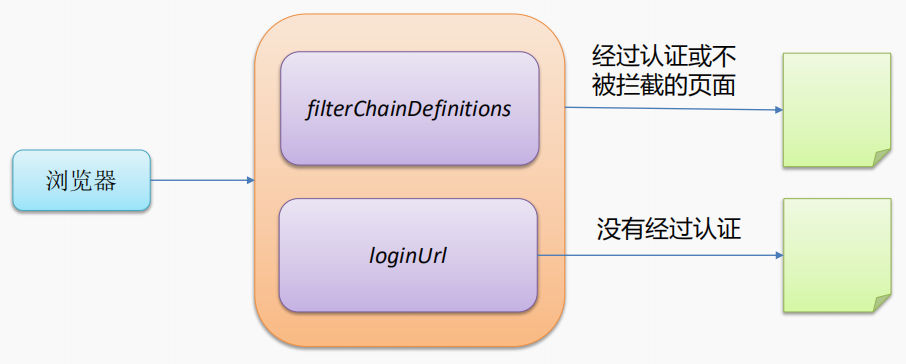
工作流程
在filterChainDefinition中定义规则,如果访问的页面满足规则或者没有配置规则,可以正常访问,否则转到loginUrl配置的页面
DelegatingFilterProxy
    <!-- Shiro Filter is defined in the spring application context: -->
	<!--
	1. 配置  Shiro 的 shiroFilter.
	2. DelegatingFilterProxy 实际上是 Filter 的一个代理对象. 默认情况下, Spring 会到 IOC 容器中查找和
	<filter-name> 对应的 filter bean. 也可以通过 targetBeanName 的初始化参数来配置 filter bean 的 id.
	-->
    <filter>
        <filter-name>shiroFilter</filter-name>
        <filter-class>org.springframework.web.filter.DelegatingFilterProxy</filter-class>
        <init-param>
            <param-name>targetFilterLifecycle</param-name>
            <param-value>true</param-value>
        </init-param>
        <!-- 通过targetBeanName配置spring的bean的id,把对shiro的操作都委托给这个bean -->
        <init-param>
            <param-name>targetBeanName</param-name>
            <param-value>shiroFilter</param-value>
        </init-param>
    </filter>

    <filter-mapping>
        <filter-name>shiroFilter</filter-name>
        <url-pattern>/*</url-pattern>
    </filter-mapping>
Url的配置规则
如果当前请求的 url 匹配 [urls] 部分的某个 url 模式,将会执行其配置的拦截器。
authc (authentication)拦截器表示需要身份认证通过后才能访问
shiro中默认的过滤器
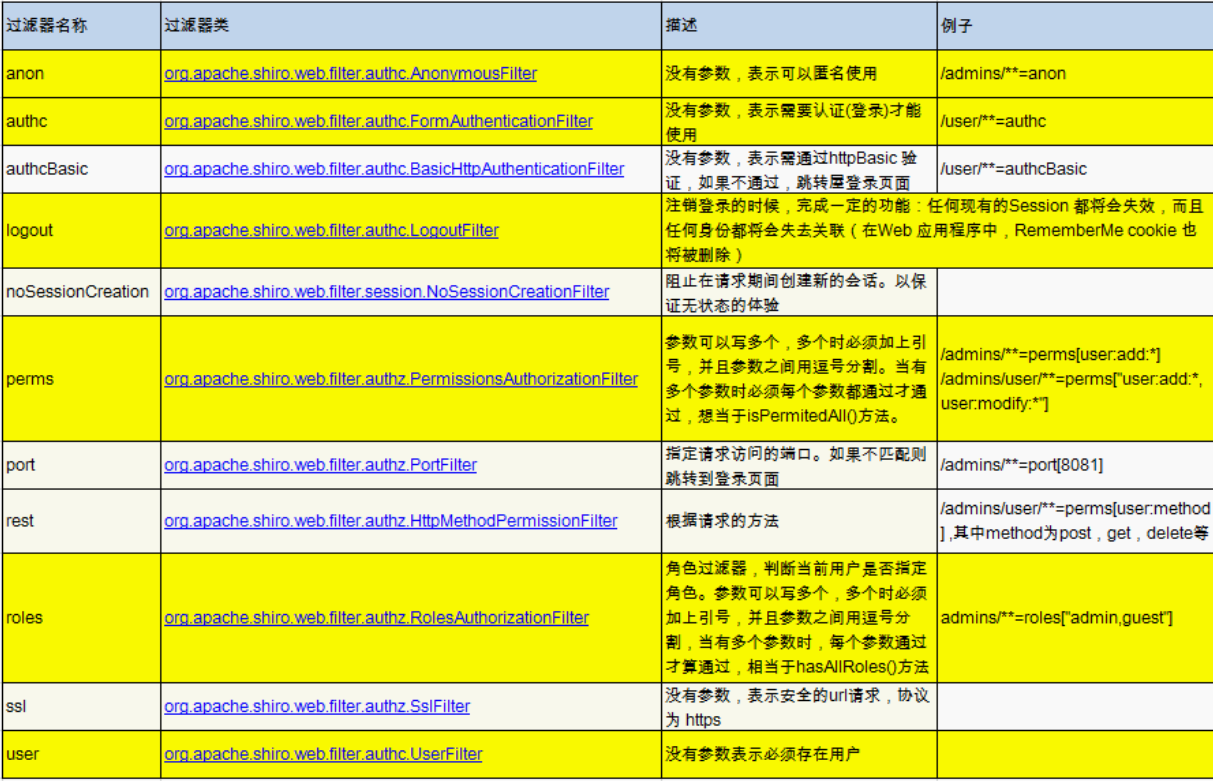
url 模式使用 Ant 风格模式
?:匹配一个字符,如 /admin? 将匹配 /admin1,但不匹配 /admin 或 /admin/;
**:匹配路径中的零个或多个路径,如 /admin/** 将匹配 /admin/a 或 /admin/a/b
URL 权限采取第一次匹配优先的方式,即从头开始使用第一个匹配的 url 模式对应的拦截器链。
/bb/**=filter1
/**=filter3
亲爱的读者:有时间可以点赞评论一下

作者其它文章


- 数字图像处理
- 剑指offer2
- 工作学习
- 这些算法有自己的方法
- 插件
- 软件使用
- 数学
- mybatis
- 计算机网络
- 正则表达式专栏
- 问题记录
- Thymeleaf
- zuul
- hystrix
- 正则表达式
- feign
- 编程相关技术
- ribbon
- 微服务
- eureka
- 分布式
- 模板
- angularjs
- javascript
- html
- c++ grammar
- c grammar
- python grammar
- java grammar
- 软件工程
- 数据库系统概论
- 转载
- 小知识
- 考研
- webservice
- 网络
- struts2
- springmvc
- springboot
- redis
- mongodb
- hibernate
- 计算机组成原理
- 当代世界经济与政治
- leetcode
- 思想道德修养与法律基础
- 毛泽东思想和中国特色社会主义理论体系概论
- 作乐
- 生活点滴
- 娱乐
- 中国近现代史纲要
- 操作系统
- sunny day, singing day
- 设计模式与算法
- 框架
- 概率论与数理统计
- 线性代数
- JAVA
- 前端
- 数据库
- 马克思主义基本原理概论
- 软考
- 生活,生,活
- 晴雨
- CSS
- LINUX
- java web整合开发王者归来
- 英语
- 高等数学
- 数据结构


全部评论